
Painting from a laptop screen – Give it a try – and let me know how it goes.
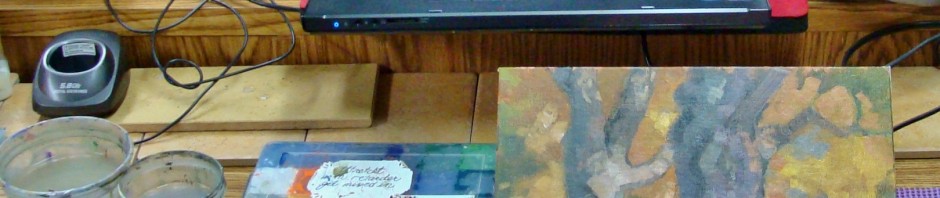
Your office desk can double as a mini studio without upsetting the paperwork flow if you follow a few simple precautions.
1. Put your paperwork away first.
2. Work small. For a suggested mini kit watch this video.
3. Protect your computer from possible spills by keeping it elevated so that it is NOT on the same level as your liquid thinners !
4. Even if you’re using a laptop, plug in a mouse so that you don’t get paint on your computer by mistake. Keep the mouse where it’s easy to reach for refreshing the screen and adjusting the image.
5. You can enlarge the image by degrees in most programs. Therefore with a touch of the mouse, you will be able to enlarge any area that you want and see lots of detail if you need it.
6. Enlarge an area until your image pixilates. You can study the colors abstractly in the separate tiles. This will give you lots of ideas.
7. Use your photo program as you paint. The saturation bar will enhance colors. Turn your reference to black and white so that you can really study the values. Try all the other options to refresh your sense of the original image.
Who knows where this lesson will take my art? Even though my first instinct was YIKES, I paint in natural light, I don’t paint from photographs, I would never paint from the computer screen… My first instinct about watercolors and gouache was “not for me”! and watercolors and gouache have turned out to be such a joy. So I will try painting from the computer screen today! Thanks for your inspiration.
Janette, Painting from a photo gives you an idea about the light, but from the computer there really is more feel for luminosity as it is illuminated. Can’t wait to hear how it goes! On most days I’ll bet you will still want to go out, but you will find the advantages to prolonged study of an unchanging landscape, and an interior work space on bad weather days is a comfort.
I agree! …and I am now a firm believer that your experiences painting outdoors are carried with you into the studio via your memory. Therefore, it is now my goal to make a marriage of my plein air experiences and studio time, using those reference photos (which totally jog my memory of the feelings I had when I took the photo) and my little outdoor studies for color reference. The office/studio upstairs is actually where that marriage is consumated and produces my beautiful children–the paintings! …Sometimes the children, er, paintings are conceived and start growing outdoors while painting plein air on a larger canvas (like a 16 x 20), but then I keep adding color and layers after studying the reference photos in the studio until the painting (child) is grown up and ready to go out into the world. You are such a good painter, Janette, I’m sure your art will really grow some gorgeous children, er, paintings when you add this process to your work.
Ever thinking…Gerry and I even watched your tribute to your mom (me for the second time) at breakfast…since it was attached so conveniently to view the preceding lesson.
Mostly, regarding this week’s lesson, I particularly Appreciated the suggestion to enlarge till the image pixilated…to see the other colors and get even more ideas.
I do a similar thing with my IPAD and the app called VA!UE VIEWER (which works on iPhone as well so folks can use it painting on site outdoors….and only for $4.99
It not only does a gray scale but it has a graph overlay to help get drawing and perspective angles right. But wait, if you respond in the the next 60 seconds you get…(just kidding) …you get the ability to start with a gray scale and shift the proportions of dark, medium and light value groups proportionally…to create a higher key or darker keyed painting. (That feature is called “levels.” in the app.). I cannot tell you how many paintings I have “saved” plein air painting because I saw that my light values were not light enough….
Glad you are back, Lil!!!!!!!!
I love your art lessons! I still consider you my teacher and the lessons that you present are always a wonderful revelation. Aaaaahhhh, so that’s how I do it!!! Thank you!
GREAT post, Lillian! …I’ve already enjoyed making larger paintings on my easel in the office upstairs while utilizing the computer for reference photos. When I get a little “stuck” on an area–I enlarge the photo like you said–It works great! I study the photo, and then I turn my attention to the painting on the easel, which is facing an entirely different direction from my computer screen. Therefore, I think it’s also a good memory exercise, plus it gives room for your muse’s interpretation of what you just saw on your photo.
Also, I really enjoyed seeing all the videos in a stream when I clicked on the one above. I’m soooo glad you fixed it that way! As you’ve said about seeing works from the students in your studio all gathered into a show somewhere, “It’s like seeing old friends again!”