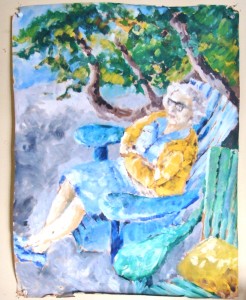
 Painted on location in 1971 when I was nineteen, this 18″ x 24″ oil on paper has been pinned to the wall here for decades. We still have the chair but now it’s my Mom (at age 94) who looks much like my Grandmother did back then.
Just the sight of an Adirondack chair makes me relax a bit, and sitting in one is divine. They have such interesting good looks, don’t you think?
But when I get out the brushes, that relaxation goes away. I start to mumble with the brush hoping to give the impression of an Adirondack chair by indicating a bunch of arms, legs and angles. Alas, how many paintings can you do called “Chairs Gone Askew”?
Let’s sort them out together and become masters of the Adirondack Chair! Ready?
supplies: pencil with eraser, paper, six pack.
Begin by getting a beer. I don’t recommend this for everyone. But that’s what I did.
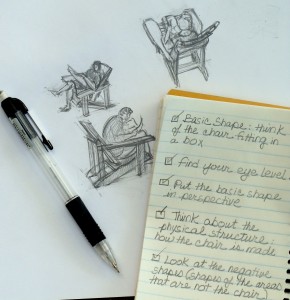
Think of the places where the legs touch the ground as the corners of a rectangle. The four ends of the arms make another rectangle. This rectangle is parallel with the first one but not directly above it – slide it forward a bit. Consider these horizontal and parallel rectangles as the top and bottom of an imaginary box. Of course, unless your chair is parallel to the picture plane, they won’t be horizontal in your drawing (enter: linear perspective), but they are horizontal in “real” life.
Why would you want to conceptualize a box? Well, you probably don’t, but if you learn to do it, it will be easier to put a basic shape into perspective. You do want proper perspective, right?
It’s very important to always keep your eye level in mind. Think of the approximate placement of the vanishing points. The leg nearest to you be the lowest down on the paper (assuming that it is below eye level, which it pretty much has to be).
I’ll wait while you get another beer.
Okay. Now think of another rectangular plane. Fit this one between the legs. Plant the back of it on the ground and slant it up (up to 30 degrees) as you move to the front of the chair. You can put in the subtle curves and round the end later. Watch the perspective.
Then simply insert the back of the chair by placing another slanted rectangle into the seat about a third of the way up from the back.
After study of the basic structure, just relax and paint a chair by noting the negative shapes.
Once you have a feel for how these chairs are put together and how they sit in space (perspective), you can draw them in any position without any references.
Next week I’ll show you how to put a box into perspective. It’s something you need to know no matter what you are painting. For some it’s intuitive, but most of us have to think about it as we work and later as we check our work. My perspective classes tend to give my students a headache, but I’ll try to make it bearable. Or, at least, beerable.

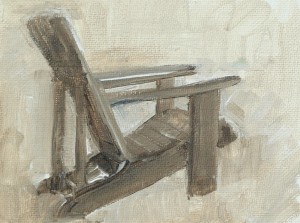
Acrylic Golden Open plus two beers 4"x5" study of Adirondack chair done in a few minutes by sliding paint around and noting the negative shapes.
Assignment: Practice! If you have an Adirondack chair, work from life. Use photos if you don’t.
Try to stay with it until you can sketch one in various positions from memory.
I’ve provided photos of our chairs here on the Vermont shore of Lake Champlain. The mountains that you see in the last shot are the Adirondacks in NY state.
This will help you with the linear perspective involved.
Go here to see what some of the other blog followers have been doing with these devilish chairs.
Click on any of the photos to enlarge them.
A long time ago, my Dad made the blue chair. You’ll recognize it and the tree behind it in the painting above. The last photo shows you two chairs “in situ” at the camp next door.


- Adirondack chair photos to practice drawing, Lillian Kennedy
- Note the eye level in each shot.
- Find those rectangles. You won’t actually see all four corners, but this process of plotting the perspective will let you know where they are and thus strengthen the sense of form in your work.
- Note the negative shapes (the shapes of the “non-chair” spaces).


Know what I love about you Lil? You will paint anything – ANYTHING – and make it look good!! And how did you know that I’ve gone back into your photo of the beach in Corsica to finish it, and was struggling with the beach chair?? Mind reader! Thanks for this post; I always enjoy them!
At first the chair did not sound hard but I was wrong about that. The instructions are first rate and the sketches are so good they make me want to be there or at least somewhere with adirondack chairs.
Love that you focused on such an iconic chaise!!!
I think that they have a wonderful spirit and oh if chairs could speak what truths they would tell of the body they cradle.
You couldn’t have written this at a better time – for me that is. I have been struggling with painting Adirondack chairs for about a month. I’ve started and cut apart several paintings.
This is a great lesson and I am getting out my sketch book right this minute and doing some practice drawings.
xoxo
Where (and when) I grew up in New Orleans, no one that I knew owned an Adirondack chair. I was a voracious reader, so I had “heard” of them, but never saw one until I was an adult. I do remember thinking they were a bit odd. But, then again, so am I. I am sure that drawing/painting one would be quite the challenge…and alcohol may be just the ticket to loosening it up. Thanks, Lil!
Pingback: How are you doing with those Adirondack Chair Drawings? | weeklyartlesson.com
Thank you for such a great tutorial! The Adirondack community is such a great place for artists to express themselves through renderings of nature. It’s amazing to see you had such style at such a young age!
Pingback: Linear Perspective: Part I – Boxes in Space (Online art lesson #27) | weeklyartlesson.com