Have you ever noticed how an error in perspective can make an otherwise excellent painting look amateurish? Weekly Art Lesson will serve up Linear Perspective in bite sized chunks so that you can digest a little at a time. Eventually, you will have a box full of information to chew on.
Speaking of boxes… This week we are going to learn to put theoretical boxes in space. But first you have to be sure to understand two things: eye level and vanishing points.
“Eye level” (also called the Horizon Line) is easily found by looking straight in front of you. The middle of your eye is your eye level. If you look down, your eye level DOES NOT change. If you look up, your eye level DOES NOT change. If you climb a ladder or slump down, your eye level changes! Your eye level is a horizontal plane extending to infinity and level with your eye. If you work from photos, you could call it “lens level”.
If an artist stands in a landscape but looks down to draw something by her feet, her eye level remains at the height of her eye and her subject will be “below eye level”.
Eye level is represented in this exercise by drawing a horizontal line across the paper. In your “real art”, you don’t draw this line; often it wouldn’t be within the picture plane anyhow.
Vainshing Points are the dots on the drawn horizon line that represent where parallel lines on the same horizontal plane (in the subject) appear to converge. They won’t look parallel to your eye or in your drawing unless they are also parallel to the picture plane. Each set of parallel lines has its own vanishing point. Ready? Set! Go…
Take a real box (a tissue box will do fine) and place it on the table in front of you and slightly to your right. Pose it for a three quarter view.
You aren’t drawing this box, but I want you to have it there to refer to so that you will know what edge on a real box you are representing in your theoretical box.
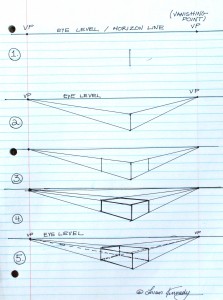
1. DRAW a horizontal line and put a dot on each end. Now you have your eye level line and vanishing points.
Draw a vertical line below your eye level line to represent the corner that is nearest to you in the box.
2. From the top and bottom of your vertical line draw lines to both vanishing points.
3. Draw two more vertical lines to represent the other two corners that you see in your box.
4. Draw lines from the top of these vertical lines to the vanishing point on the opposite side of the box. Firm up the lines that will be part of your box.
5. Make the box transparent by drawing the edges that you can’t see. From the bottom of the outside corners draw a line to the same vanishing point that line at the top of the corner goes towards. Drop in a vertical between the top and bottom at the back corner.
Note: Four lines that are parallel with each other on the real box now converge at each vanishing point.
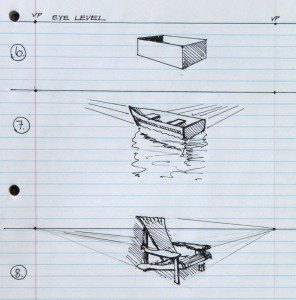
6. Erase the perspective lines that aren’t part of your box and then shade your box to look like it’s empty.
7. Beyond the box: Using these same guidelines, create something (other than a box) in the same position.
8. Your object can go above eye level. The rules for what is above eye level are the same. Print out the first page and turn it so that bottom becomes the top. You will see how to do a box above eye level. Can you tell that the chair still confuses me?
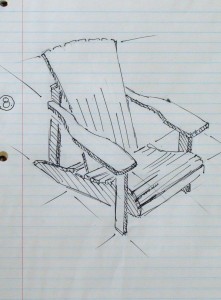
8+. Take a real object (in this case I used the Adirondack chair) and put it in relatively the same position and draw it from life. Do not create vanishing points or a horizon line. Think how far off the edge of the paper the vanishing points would be in this last drawing. Mentally follow the perspective lines to see approximately where they converge.
By keeping linear perspective in mind as you work, you will remember that the lowest of the parallel lines (when below eye level) has to angle the most. the line closest to eye level will slant the least.
Now you can catch that I didn’t get some of this right. Doesn’t it seem like the near front leg should be longer at the bottom?
Go to How to Draw an Adirondack Chair for more on getting the chair drawn correctly.
WARNING: Thoroughly chew this lesson before swallowing.There are so many more things to include, but I think we’ve covered a big enough bite for one lesson! You can come back to it over time. I’ll give you a while to digest before doing Part II.


